You’re paying Google every day. But without conversion tracking, you have no clue which ads make sales and which burn cash.
Here’s the scary part: even businesses that think they have tracking set up are losing data. In 2026, standard Google Ads Conversion Tracking misses 30 to 50 percent of actual conversions. Safari and Firefox block tracking cookies. iOS privacy rules cut off data. Ad blockers kill tags. GDPR consent banners stop tracking before it starts.
When Google sees less data, its AI makes worse bidding choices. Your cost per sale goes up. Your best campaigns look broken. You pause them. You lose money you never had to lose.
This guide fixes all of that. You’ll learn the exact 5 steps to set up Google Ads Conversion Tracking in 2026 — plus Enhanced Conversions, Consent Mode V2, offline conversion imports, attribution settings, and the common mistakes that silently kill your data.
No jargon. No fluff. Just clear steps you can follow in the next 20 to 30 minutes.
What Is Google Ads Conversion Tracking?
Google Ads Conversion Tracking is a free measurement tool built into Google Ads. It records user actions — like purchases, sign-ups, form fills, phone calls, or app installs — after someone clicks your ad.
It works like this:
- A user clicks your Google Ad
- Google places a small cookie on their browser
- That user visits your site, browses, and (hopefully) completes a goal — like placing an order
- A tracking tag on your thank-you page fires
- Google connects that action back to the original ad click
Now you know exactly which ad, keyword, campaign, device, and audience drove that sale.
Why This Changes Everything
Without conversion tracking, Google Ads is a black box. You see clicks and costs — but not results.
With conversion tracking, you unlock:
- Smart Bidding — Google’s AI uses your conversion data to find more buyers like your best customers
- Real ROI reporting — see revenue per keyword, not just clicks
- Better budget decisions — kill losers, scale winners with confidence
- Audience insights — see which locations, devices, and times convert best
- Cross-campaign learning — Google applies patterns from high-performers across your account
Every serious bidding strategy — Maximize Conversions, Target CPA, Target ROAS, Performance Max — runs on conversion data. No data, no results.
Types of Conversions You Can Track
Before you set anything up, know what you can track. Google Ads supports five main conversion types:
1. Website Conversions
These are the most common. Examples:
- Purchases on an e-commerce store
- Lead form submissions
- Newsletter sign-ups
- Account registrations
- Add-to-cart events
- Scroll or page-view events
- Button clicks (like “Book a Demo”)
2. Phone Call Conversions
Track calls from three sources:
- Calls from a phone number in your ad (call extensions)
- Calls to a Google forwarding number on your website
- Clicks on a phone number from a mobile site
3. App Conversions
For mobile app advertisers:
- App installs from Google Play or the App Store
- First-opens after install
- In-app purchases
- Key events (like completing a tutorial or reaching level 10)
4. Offline Conversions
This is where most businesses leave money on the table. Offline conversions let you import data from your CRM — like closed deals, qualified leads, or phone sales — back into Google Ads.
This way, Google optimizes for actual revenue, not just form fills that never become customers.
5. Local Conversions
For businesses with physical locations:
- Store visits (Google uses location data)
- Driving directions clicks
- Phone calls from Google Business Profile
Which should you track? Most e-commerce stores need website purchases plus add-to-cart. Most lead-gen businesses need form submissions plus phone calls plus offline imports from their CRM. App companies need installs plus in-app events.
Pick 1 to 3 primary conversions and 2 to 4 secondary ones. Too many confuses Smart Bidding.
Step 1: Create a Conversion Action in Google Ads
Let’s get hands-on. Log in to your Google Ads account.
Navigate to: Goals → Conversions → Summary (left menu)
Click the blue + Create conversion action button at the top.
You’ll see four options:
- Website — for online actions like purchases and form fills
- App — for mobile app installs and events
- Phone calls — for calls from ads or your site
- Import — for offline conversions or Google Analytics 4 events
For this guide, pick Website. It covers 90 percent of businesses.
Enter Your Website URL
Type your full domain (example: https://yourstore.com) and click Scan.
Google will crawl your site and suggest events it can detect automatically — like purchase pages, contact forms, or newsletter sign-ups. You can use these suggestions or create your own.
If Google’s suggestions match what you want, click Add conversion action next to them. If not, click + Add conversion action manually and continue.
Step 2: Define What to Track and Set Its Value
This is the most important step. Get it wrong here and your data will be garbage forever.
Pick Your Goal Category
Google Ads groups conversions into categories:
- Purchase — someone bought something
- Add to cart — someone added a product to their cart
- Begin checkout — someone started checkout
- Submit lead form — someone sent a contact form
- Sign-up — someone created an account
- Page view — someone hit a specific page (like a thank-you page)
- Request quote — someone asked for a quote
- Book appointment — someone scheduled a meeting
- Outbound click — someone clicked out to another domain
- Other — anything that doesn’t fit above
Google uses this category to understand the intent of the action. A Purchase means real money. A Lead means future revenue. Smart Bidding treats them differently, so choose carefully.
Name It Something Clear
Use names like:
- “Main Store Purchase”
- “Newsletter Signup — Footer”
- “Contact Form — Homepage”
- “Demo Booked”
Avoid vague names like “Conversion 1” or “Thanks Page.” Future-you will hate past-you.
Set the Conversion Value
You have three choices:
- Use the same value for each conversion — good for leads. If one lead is worth $50 to your business, set it to $50.
- Use different values for each conversion — use this for e-commerce. The actual order total gets passed through the tag.
- Don’t use a value — don’t pick this. Always assign some value, even a rough one. Smart Bidding needs it.
Pro tip for lead-gen: Calculate your lead value using this formula:
(Average deal size × Close rate) = Lead value
Example: $2,000 average deal × 10% close rate = $200 per lead.
Pick the Count: “Every” or “One”
This trips up most advertisers. Here’s the rule:
- “Every” — counts every conversion. Use for purchases. If someone buys twice, that’s two real sales.
- “One” — counts only the first conversion per ad click. Use for leads, sign-ups, and form fills. If someone submits your contact form three times, that’s still one lead.
Getting this wrong inflates your numbers by 30 to 50 percent and breaks Smart Bidding.
Set the Conversion Window
The conversion window is how long Google waits to attribute a sale back to an ad click.
- Click-through window: Default is 30 days. Range is 1 to 90 days.
- View-through window: Default is 1 day. Range is 1 to 30 days.
Rule of thumb:
- E-commerce (low ticket): 7 to 30 days
- E-commerce (high ticket): 30 to 60 days
- B2B / SaaS: 60 to 90 days
- Real estate / enterprise sales: 90 days
Match the window to your real sales cycle. A 7-day window for a $50,000 B2B software deal will under-report conversions. A 90-day window for a $20 t-shirt will over-attribute.
Pick Your Attribution Model
The attribution model decides how credit gets shared when a user clicks multiple ads before converting.
Options:
- Data-driven attribution (DDA) — Google’s AI splits credit based on actual impact. Default and recommended in 2026.
- Last click — 100 percent credit to the final ad click. Old-school and outdated.
- First click — 100 percent credit to the first ad click.
- Linear — credit split evenly across all clicks.
- Time decay — more credit to clicks closer to conversion.
- Position-based — 40 percent to first, 40 percent to last, 20 percent split between middle.
Stick with Data-Driven Attribution. It’s what Smart Bidding uses. It’s more accurate. Every top-performing account in 2026 uses DDA.
Include in “Conversions” Column
For your most important actions (like purchases), toggle this ON. This is the column Smart Bidding optimizes toward.
For smaller actions (like page views or video plays), toggle this OFF and keep them as secondary. They’ll show in “All conversions” for reporting but won’t confuse the AI.
Click Save and continue.
Step 3: Install the Google Tag on Your Website
Now you need to put the tracking code on your site. You have three paths — pick the one that matches your setup.
Option A: Shopify, WooCommerce, Wix, Squarespace, BigCommerce
Most e-commerce platforms have a built-in spot to paste your Google tag.
Shopify:
- Go to Online Store → Preferences → Google tag
- Paste your Conversion ID (starts with
AW-) - For purchase tracking, install the free Google & YouTube app from the Shopify App Store — it auto-fires the purchase tag
WooCommerce:
- Install the Site Kit by Google plugin
- Connect your Google Ads account
- Enable conversion tracking — it fires automatically on order-received pages
Wix / Squarespace / BigCommerce: All three have native Google Ads integrations in their settings. Paste your Conversion ID and Label.
Option B: Google Tag Manager (Recommended for Flexibility)
Google Tag Manager (GTM) is the best long-term option. It lets you manage all your tags in one place without touching site code.
Setup:
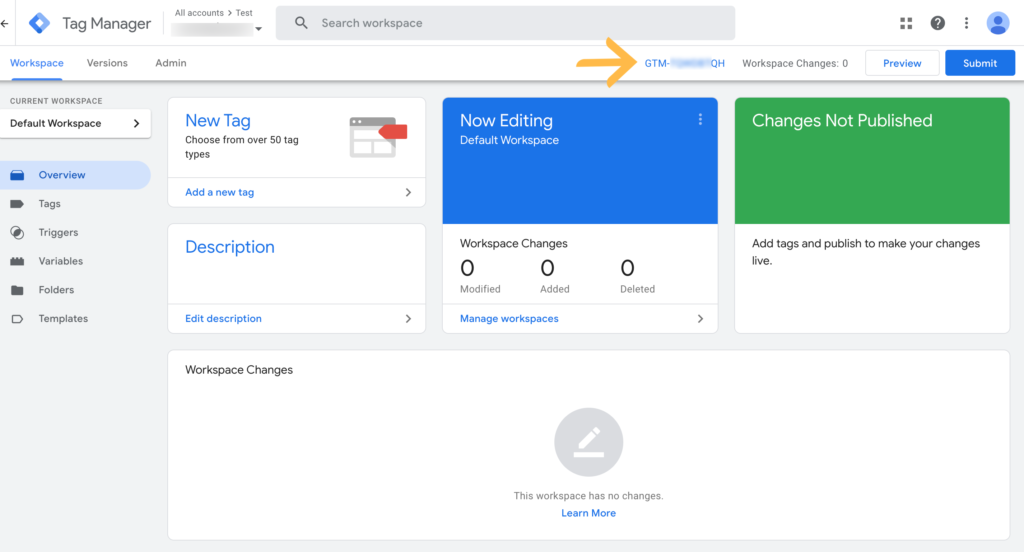
- Create a GTM account at
tagmanager.google.com - Install the GTM container code on your site (or have your developer do it once)
- Create a Conversion Linker tag:
- Tag type: Conversion Linker
- Trigger: All Pages
- This tag saves ad click data in first-party cookies — critical for Enhanced Conversions and privacy rules
- Create a Google Ads Conversion Tracking tag:
- Tag type: Google Ads Conversion Tracking
- Conversion ID: paste from Google Ads
- Conversion Label: paste from Google Ads
- Conversion Value:
{{Transaction Total}}(if using data layer) - Transaction ID:
{{Transaction ID}}(prevents double-counting) - Currency Code:
{{Currency}}
- Set the trigger: Fire only on your thank-you page or order-confirmed URL — never on all pages
- Preview using GTM’s Preview mode to confirm it fires correctly
- Publish the container
Option C: Direct Code Paste
If you’re on a custom site, Google gives you two snippets:
- Google tag (gtag.js) — paste inside
<head>on every page of your site - Event snippet — paste ONLY on the conversion page (like
/thank-youor/order-confirmed)
Common mistake: Pasting the event snippet on every page. This fires the tag on every pageview and inflates conversions by 10x. Only fire it on the final conversion page.
For e-commerce, the event snippet should pass dynamic values like this:
gtag('event', 'conversion', {
  'send_to': 'AW-XXXXXXXXX/YYYYYYYYYY',
  'value': 49.99,
  'currency': 'USD',
  'transaction_id': '12345'
});
The transaction_id is critical. It tells Google “this specific order is unique” — so if someone refreshes the thank-you page, you don’t get double conversions.
Step 4: Turn On Enhanced Conversions (The Step 80% of Articles Skip)
This is the single biggest accuracy improvement you can make in 2026. Skip it and you lose up to 30 percent of your real conversions to iOS, Safari, Firefox, and ad blockers.
What Enhanced Conversions Does
When a user converts on your site, they give you first-party data — their email, phone number, or address. Enhanced Conversions:
- Hashes that data using SHA-256 encryption (one-way, unreadable, privacy-safe)
- Sends the hashed data to Google along with the conversion
- Matches it against Google’s signed-in users (Gmail, YouTube, Chrome, Android)
- Recovers the conversion attribution even when cookies are blocked or deleted
This recovers 5 to 30 percent of conversions you’d otherwise lose. It’s GDPR-compliant. It works in Safari. It survives ad blockers.
How to Turn It On
In Google Ads:
- Go to Goals → Conversions → Settings
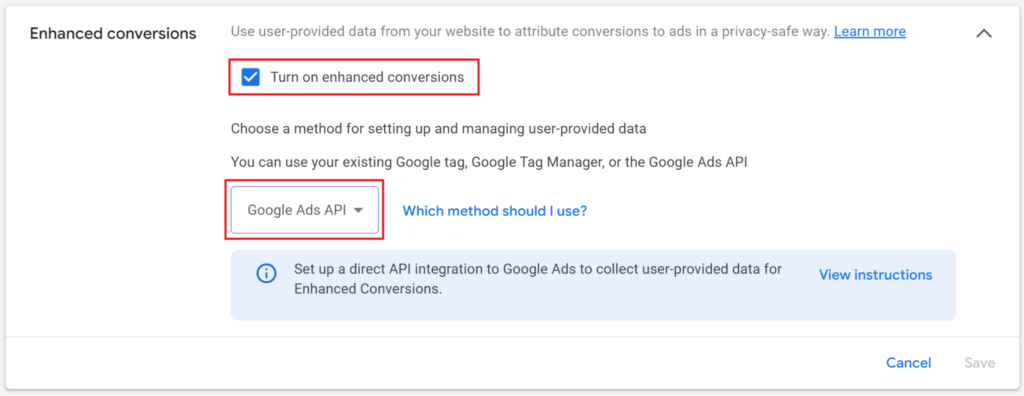
- Expand Enhanced conversions
- Toggle Turn on Enhanced Conversions
- Pick your implementation method:
- Google Tag Manager (easiest)
- Google tag (gtag.js)
- Google Ads API (for advanced setups)
- Agree to the Customer Data Terms
In Google Tag Manager:
- Open your Google Ads Conversion Tracking tag
- Check Include user-provided data from your website
- Create a new User-Provided Data variable
- Set Type to Automatic collection (Google detects fields) OR Manual configuration (you map fields yourself)
- Save, preview, publish
On Shopify: The Google & YouTube app handles Enhanced Conversions automatically once you check the box.
Validation: After setup, go back to the Enhanced Conversions settings. Within 48 hours, you’ll see a status indicator:
- 🟢 Recording — working correctly
- 🟡 Recording with issues — partial setup, fix flagged issues
- 🔴 No recent data — broken, troubleshoot
Step 5: Set Up Consent Mode V2 (New for 2026)
If you have any visitors from Europe, the UK, or Switzerland, Consent Mode V2 isn’t optional. It’s legally required as of March 2024 — and it recovers another 15 to 25 percent of conversions lost to cookie banners.
What Is Consent Mode V2?
When a user hits your site, they see a cookie banner. If they reject cookies, your tracking tag doesn’t fire — and you lose that conversion forever.
Consent Mode V2 changes that. When a user rejects cookies:
- Google’s tags still fire, but in “cookieless mode”
- No personal data is sent
- Google uses AI modeling to estimate how many conversions happened anonymously
- These modeled conversions get reported in your Google Ads account
The result: accurate bidding signals even when users say no to cookies.
How to Set Up Consent Mode V2
Step 1: Pick a consent management platform (CMP)
Google recommends CMPs from its certified partner list:
- Cookiebot
- OneTrust
- Termly
- CookieYes
- Iubenda
- Usercentrics
Most have a free tier for small sites.
Step 2: Install the CMP on your site
Follow the CMP’s installation guide. It places a cookie banner and passes consent signals to your tags.
Step 3: Connect Consent Mode V2 to Google
Inside your CMP, enable:
ad_storage— for ad cookiesanalytics_storage— for GA4ad_user_data— required for 2026ad_personalization— required for 2026
The last two are new for 2026. Most CMPs added them automatically. Double-check yours.
Step 4: Verify inside Google Ads
Go to Admin → Consent mode settings inside Google Ads. You should see a status:
- “Recording consent signals” — working correctly
- “No consent signals” — CMP not connected
Do You Need This If You’re Not in Europe?
If your traffic is 100 percent US or non-EU, Consent Mode V2 is optional but still recommended. Privacy laws are spreading — California (CCPA/CPRA), Colorado, Virginia, and other states have their own rules. Setting this up now future-proofs your setup.
Bonus Step: Test Everything Before You Trust It
Never assume tracking works. Test it.
Install Google Tag Assistant
- Add the free Google Tag Assistant Chrome extension
- Go to
tagassistant.google.com - Enter your site URL and click Connect
- Browse your site like a real customer
- Complete a real test conversion (place a $1 order, submit a form)
- Check the Tag Assistant panel
You should see:
- 🟢 Google tag fired on page load
- 🟢 Conversion Linker fired on all pages
- 🟢 Conversion tracking tag fired on the thank-you page — once
- 🟢 Conversion value and transaction ID present
- 🟢 Enhanced Conversions user data sent (hashed)
Check Inside Google Ads
Within 3 to 24 hours, your test conversion should show up:
- Go to Goals → Conversions → Summary
- Find your conversion action
- Status should say Recording conversions (green checkmark)
If status shows No recent conversions or Tag inactive, your tag isn’t firing correctly.
Common Reasons Tracking Breaks
- Event snippet installed on every page instead of just the conversion page → fires 10x too often
- Conversion ID and Label swapped → tag fires but nothing records
- Ad blocker active in your browser → test in Incognito mode with extensions off
- Shopify: Google & YouTube app installed twice → double-counting
- GTM container not published after changes → old tags still live
- Auto-tagging turned off in Google Ads → no GCLID means no attribution
- Cross-domain tracking missing → checkout on a different domain loses data
- Thank-you page redirects before tag fires → tag never loads
Debug one issue at a time. Fix. Retest.
Advanced: Import Offline Conversions for Maximum Accuracy
This step separates pro accounts from hobbyists. Offline conversion imports tell Google which leads actually became paying customers — not just which leads filled out a form.
Why This Matters
Imagine two campaigns:
- Campaign A: 100 leads at $10 each = $1,000 spend, 100 leads
- Campaign B: 50 leads at $30 each = $1,500 spend, 50 leads
Campaign A looks better on paper. But what if Campaign B’s leads close at 20 percent (10 sales) and Campaign A’s close at 2 percent (2 sales)?
- Campaign A: $1,000 / 2 sales = $500 cost per sale
- Campaign B: $1,500 / 10 sales = $150 cost per sale
Without offline imports, you scale Campaign A (the loser) and kill Campaign B (the winner). Offline imports flip that decision.
How to Set It Up
Method 1: Enhanced Conversions for Leads (Easiest)
- In your lead form, collect email or phone (hashed, first-party)
- When a lead closes in your CRM, upload the email/phone back to Google Ads
- Google matches the hashed data to the original ad click
- Revenue gets attributed to the right campaign
Tools that automate this:
- HubSpot’s Google Ads integration
- Salesforce Google Ads connector
- Zapier (Google Ads integration)
- Make.com
- Native Google Ads API
Method 2: GCLID Upload (Classic Method)
- Capture the GCLID (Google Click Identifier) when a user submits your form
- Store it with their contact in your CRM
- When they close, upload a CSV to Google Ads with: GCLID, conversion name, conversion time, value, currency
- Go to Goals → Uploads in Google Ads to import
Frequency: Upload daily if possible, or at least weekly. Google’s bidding AI needs fresh data.
Advanced: Server-Side Tagging (Highest Accuracy)
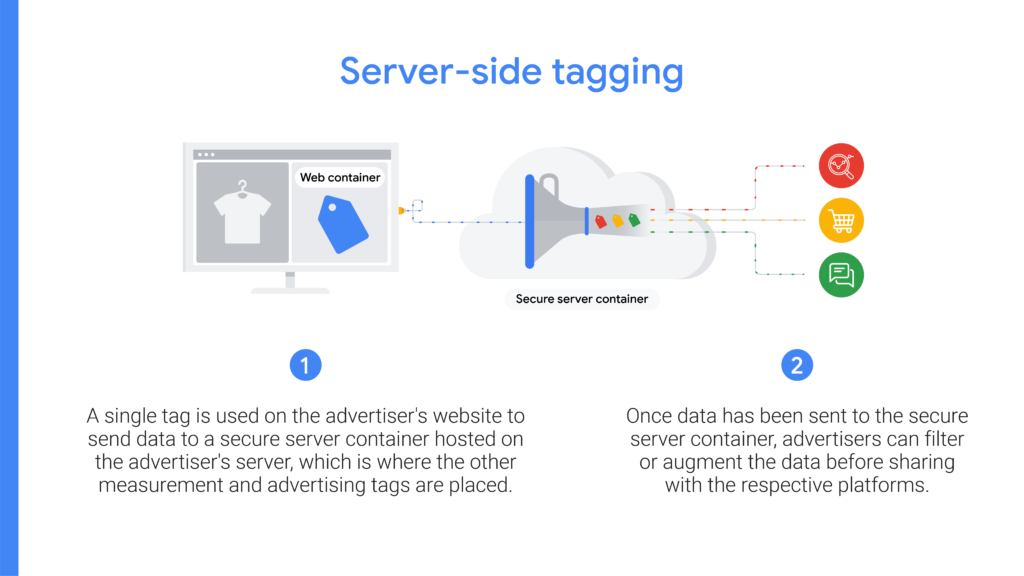
Server-side tagging is the gold standard. Instead of firing tags in the user’s browser (where ad blockers live), you fire them on your own server.
Benefits
- Bypasses 100 percent of browser ad blockers
- Reduces page load time (fewer scripts running)
- Better data privacy (you control what leaves your server)
- First-party cookie handling (longer cookie lifetimes)
- 15 to 30 percent more conversions tracked vs. client-side only
Is It Worth the Effort?
Yes if:
- You spend $5,000+ per month on Google Ads
- Your site has heavy EU traffic
- You use Shopify Plus, BigCommerce Enterprise, or custom e-commerce
- You already use GTM
No if:
- You spend under $1,000 per month
- You’re just getting started
- You don’t have technical resources
How It Works (Simplified)
- Set up a server-side GTM container (hosted on Google Cloud, Stape.io, or Analytify)
- Your website sends data to your server container (not directly to Google)
- Your server container processes the data, strips what you don’t want shared, and forwards to Google Ads
- The Conversion Linker and Enhanced Conversions tags live on the server
Full server-side setup takes 2 to 6 hours. Tools like Stape.io make it easier with one-click hosting.
The Conversion Tracking Stack for 2026
Here’s the complete stack every serious advertiser needs in 2026:
| Layer | Tool | Why You Need It |
|---|---|---|
| Foundation | Google Ads conversion tracking | The core tag that records actions |
| Accuracy boost | Enhanced Conversions | Recovers 5–30% of lost conversions via hashed data |
| Privacy compliance | Consent Mode V2 | Legally required in EU, recovers 15–25% of consent-rejected conversions |
| Attribution | Data-Driven Attribution | Splits credit fairly across touchpoints |
| Revenue truth | Offline Conversion Import | Tells Google which leads closed into real sales |
| Bulletproof accuracy | Server-side tagging | Bypasses ad blockers, improves load time |
| Cross-channel view | GA4 + Google Ads link | See the full customer journey |
| Validation | Google Tag Assistant | Confirms tags fire correctly |
Skipping any layer leaves a gap in the data your bidding AI depends on.
Common Mistakes That Destroy Your Tracking
1. Tracking Vanity Goals
Tracking /about or /contact page views as primary conversions. These aren’t conversions — they’re just clicks. Smart Bidding optimizes toward whatever you mark as primary. Track vanity goals and you’ll get more vanity clicks, not sales.
2. Wrong Count Setting
Using “Every” for lead forms. Someone submits your form three times? Google counts three leads. Your CPA looks amazing. Your actual pipeline stays the same. Always use “One” for leads.
3. Importing GA4 Goals as “Primary” Duplicates
If you have a native Google Ads conversion AND a GA4-imported version of the same action, both fire on the same purchase. Result: double-counted data. Mark only one as primary.
4. Missing Transaction IDs
Without transaction IDs, refreshing a thank-you page counts as a new sale. Some stores report 300 percent of their real revenue because of this.
5. Wrong Conversion Window
Using the default 30-day window for a 90-day B2B sales cycle. You under-report conversions by 60 percent. Match the window to your real cycle.
6. Breaking Tags During Site Updates
Every time you update your site, theme, or app stack, tags can break silently. Nobody notices for weeks. Set a calendar reminder to check tracking monthly.
7. No Cross-Domain Setup
If your checkout happens on a different domain (like a third-party payment gateway), the GCLID gets lost. Set up cross-domain tracking in your Google tag settings.
8. Ignoring View-Through Conversions
View-through conversions (someone saw your ad, didn’t click, then converted later) can inflate numbers. Keep the window short (1–3 days) to avoid over-attribution.
FAQ — Google Ads Conversion Tracking
How long does it take for conversions to show up?
Usually 3 to 24 hours after the first real conversion fires. If nothing shows after 48 hours, your tag is probably broken. Run Google Tag Assistant to debug.
Should I use Google Analytics 4 or Google Ads conversions?
Use Google Ads conversions as your primary. They’re more accurate for ad bidding. Import GA4 goals only as secondary signals for reporting context — never mark them as primary Smart Bidding goals.
Do I need a developer to set this up?
For Shopify, WooCommerce, Wix, Squarespace, and BigCommerce — no. Built-in integrations handle it.
For custom-built sites — a developer helps with Step 3 (installing tags). Everything else is click-through.
What’s the difference between click-through and view-through conversions?
Click-through: User clicked your ad, then converted. Higher confidence. Use as primary.
View-through: User saw your ad (display or YouTube) but didn’t click, then converted later. Lower confidence. Keep window short.
How much does Google Ads Conversion Tracking cost?
It’s free. You only pay for ads. Tracking is built into Google Ads at no extra cost.
Is Enhanced Conversions GDPR-compliant?
Yes. Data is hashed with SHA-256 (irreversible encryption) before it leaves your site. Google cannot reverse it to read the original email or phone number. Combined with Consent Mode V2, it meets GDPR requirements.
Can I track conversions without a thank-you page?
Yes. Use click-based event tracking in GTM — fire a tag when a user clicks a specific button (like “Buy Now” or “Submit”). Not as reliable as URL-based tracking, but works for single-page apps.
Should I use “Include in Conversions” for all actions?
No. Only mark actions you want Smart Bidding to optimize toward (usually purchases or main leads). Keep secondary actions like “Add to Cart” or “Page View” as secondary — they’ll still track but won’t confuse bidding.
What to Do After Tracking Is Live
Setting up tracking is step one. Acting on the data is where profit comes from.
Week 1: Clean Up Bad Keywords
- Check the Search Terms report
- Add negative keywords for searches that don’t match your product
- Cut or lower bids on keywords with 100+ clicks and 0 conversions
Week 2: Switch to Smart Bidding
- Once you have 15+ conversions in 30 days, switch to Maximize Conversions or Target CPA
- With 50+ conversions per month, try Target ROAS for e-commerce
- Let it learn for 2 weeks before judging performance
Week 3: Check Device and Location Splits
- Mobile often wastes 30–50 percent of ad spend on clicks that don’t convert
- Use bid adjustments to shift budget to devices and locations that convert best
- Check Audience Insights to see who’s buying
Month 1: Review and Refine
- Look at which campaigns, ad groups, and assets drive conversions
- Pause the bottom 20 percent
- Double budgets on the top 20 percent
- Test new ad copy variations against your winners
Every Month: Audit Tracking Health
- Run Google Tag Assistant on your site
- Check Enhanced Conversions status (should say “Recording”)
- Compare Google Ads conversions to your CRM or Shopify data
- Look for broken tags after any site updates